Decor DIY: Mini Raffia Planter
Spring is coming soon and when I think of the Spring the first thing that comes to my mind are plants. Everything is starting to grow and blossom and I have decided to celebrate this lovely time of the year by creating this simple mini raffia planters for my succulents.
All things you need for this tutorial are affordable and very easy to find, most of them you probably already have at home, and as well it is not time-consuming. To create it entirely it took me about two hours, which is a perfect time for when you are relaxing, drinking coffee or just simply when you want to be creative. There are many types of raffia rope but in this tutorial I have used natural raffia, you can find it on Amazon, Ebay, in Walmart or any craft store and the prices are from 5$.
You will need:
▪ a package of natural raffia rope
▪ hot glue gun (or all purpose glue)
▪ scissors
▪ measuring tape
▪ twine, yarn or any decorative ribbon
▪ crochet hook
Start by taking 12 strings of raffia rope, place them together and hold at the one end. With another string, folded 2 or 3 times, make a knot that will secure strings and keep them in place.
Use scissors to cut extra string around the knot and you are ready for next step which is making a french braid. Divide 12 strings into 3 sections, each consisting of 4 raffia strings and create traditional braid by crossing left section over to the center, then right over to center and so on.
The goal is to create a braided raffia rope that is around 180cm long (around 70 inches).
Usually, raffia strings are between 100-110cm long (around 40-43 inches), during braiding process more strings have to be added to the braid. When sections are getting closer to the end, add new string to section and continue braiding to secure it. Repeat the process in every section. I suggest you to add strings gradually; every cross over is adding another string to section. This might come naturally because, by not being exactly the same length and width, some strings in sections can come to an end before others.
To reach final length I had to add new strings to sections 2 times.
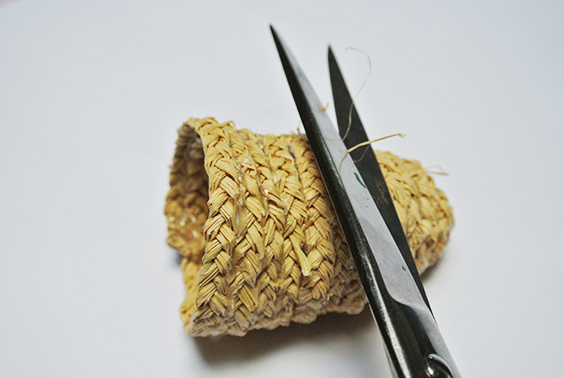
When the braid is done just make a tight knot, cut extra string as shown on the picture above and you are done. Oh, and even though this DIY is very simple I had a little helper called Marley.
Next step is creating a bowl (actual planter) by using braided string you have just made and hot glue gun. Place small amount of glue on one knot and simply start to twist string around it. Hold tight until glue gets thick and continue the process.
To create bowl shape, put the glue on the top of previously glued string and stick inner part of 'free' string to it.
When you have reached the end of string, fold it with your fingers to create crease. Add glue on the inside of planter, place the end of string on it and press until the glue gets thick.
Use scissors to cut excess raffia and that is it! All that is left to do is create string to hang your planter.
To do so, take twine or any decoratve ribbon of your choice, cut 3 strings 60cm long (around 23 inches) and fold them in half. Take crochet hook and pierce through the middle of top braided string. Hook folded ribbon and pull it out through the braided string enough so you can put your thumb and index finger through the loop.
With your thumb and index finger pull the other part of the ribbon through loop, pull tight and make a knot so the ribbon will stay in place.
Repeat the same process on other 2 ribbons, get them all together and make a knot at the top of ribbons. Put any type of plant in your planter, hang it wherever you feel like and you are done! :)
Note: Raffia is natural material, planting directly into it is not recommended because moisture can eventually make it soften. I suggest that you use plants planted in plastic plant containers and simply place them in you new raffia planters.
I truly hope you have enjoyed this simple DIY and let me know if you make your own!
With love, Helena


Comments
Post a Comment